10 Tips to Improve WordPress Performance & Make it load faster
When I lacked ideas for my next blog post, I decided to spend my time to improve WordPress performance. I learned a lot while tuning for performance, so I decided to write this article.
Why Should You Improve WordPress Performance?
If a page takes 10 seconds to load, it will result in bad user experience. For the same reason, Google may push it down in the Search Engine Result Page (SERP).
Yes, there is no proof of a direct correlation between page speed and ranking in Google SERP.
But, I wasn’t willing to take the chance, and neither should you.
After all, optimizing for good page speed is a win-win situation. Even if it doesn’t have any impact on your ranking in Google SERP, it will still give a better user experience for your readers.

So, without further ado, let’s start tuning to improve WordPress performance.
This article is a long one. Feel free to jump to topics that interest you and skip the ones that don’t.
Table of Content
- Optimizing DNS Lookup
- Optimizing Request Processing Time
- Use a CDN
- Optimizing CSS and JavaScript Files
- Optimizing Images
- Set up HTTP Caching
- Enable GZip compression
- Show Excerpts in Archives
- Use Pagination and Lazy Loading for Comments
- Clean Up the Database
Plugins Used:
Following are some plugins that we will use to optimize the WordPress blog:
Many alternatives are available for these plugins. All of them work similarly, so just choose based on your preference.
1. Optimizing DNS Lookup
When a user visits a website, the first step is to resolve the domain name into an IP Address. This process is called DNS lookup, and a slow DNS lookup affects the TTFB.
How to optimize the DNS lookup?
Use a Fast DNS Provider
The speed of the DNS lookup depends on the DNS provider. That is why it is crucial to choose the right DNS provider. You can use tools like DNSPerf to find high-speed DNS Providers.
I’m using AWS as my DNS provider. It is not the fastest DNS provider, but it is good enough for me. If you want to do the same, I have already written a guide to set up WordPress on AWS Lightsail.
But, if you are looking for a better solution, I would recommend you to go with reputed DNS providers like Cloudflare.
Set Longer Time To Live (TTL) for DNS Records
When a DNS lookup happens for the first time, the response is cached at multiple places – Local Machine and DNS resolvers.
For subsequent requests, DNS lookups are avoided. Instead, the cached data is used as long as it is not expired. To take advantage of this caching, we can set a longer TTL for the cache.
With longer TTL, changes done to DNS records will take more time to reflect.
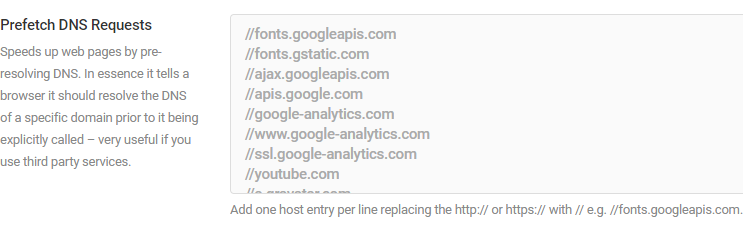
Use DNS Prefetching
DNS Prefetching is a way to instruct the browser to resolve a domain name to an IP address before the actual resources get requested. DNS Prefetching works only for third-party resources.
You can use rel="dns-prefetch" in a link tag on your pages. For example:
<link rel="dns-prefetch" href="https://fonts.gstatic.com/" />To enable DNS prefetching in WordPress, you can use the Hummingbird plugin. Navigate to “Hummingbird -> Advanced Tools”, in the “General” tab, scroll to the bottom to find the DNS prefetching settings.
Add the domain names that you want to prefetch.
2. Optimizing Request Processing Time
The last and crucial factor that determines the TTFB is the processing time. It is the time taken by the server to parse the request, make database and other system calls, and finally format the response.
So how to improve the processing time?
Good Hosting Provider
Hosting provider is extremely important, they play a crucial role in the site performance. So, please, please don’t choose an average hosting provider just to save a few bucks.
Hosting providers like BlueHost, SiteGround and WPEngine are well optimized and are used by many people.
Prefer Virtual Private Servers (VPS) over Shared Hosting plans. In shared hosting, the server resources are shared by many websites. If one website is eating more resources then other websites will start to starve.
In VPS, you also get access to the server configuration, which allows us to do more performance tuning.
Page Caching
WordPress generates an HTML code as a response to requests, and it can be cached. For the second request made to the same post or page, the cached HTML code is returned instead of processing the request again.
To enable page cache, navigate to “Hummingbird -> Caching”.
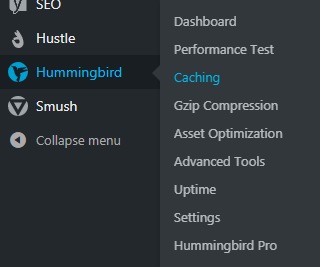
In the “Page Caching” tab, click the “Activate” button.
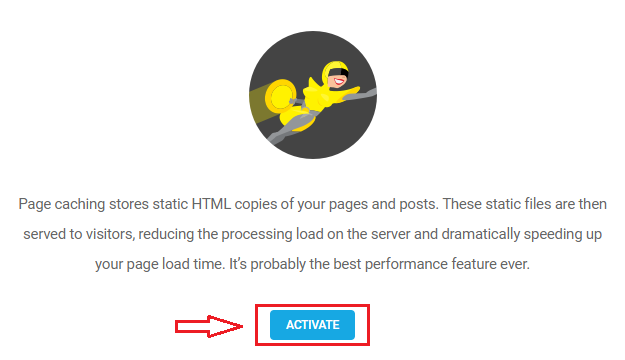
Once activated, the server will automatically start caching all the pages and posts.
3. Use a CDN
Content Distribution Networks (CDN) is a service that sits between the browser and the server.
CDNs have multiple data centers that are strategically located around the world, called Points of Presence (PoP). The requests are routed to a PoP that is closer to the user’s geographic location, thus reducing the total round trip time.
You can use CDNs like Cloudfront or Cloudflare to cache and serve your static files to speed up their delivery.
Read:
4. Optimizing CSS and JavaScript Files
To optimize the CSS and JavaScript files, we can use the asset optimization feature in the Hummingbird plugin.
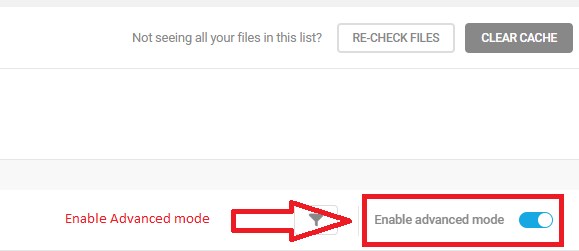
Navigate to “Hummingbird -> Asset Optimization” and click “Activate” to enable asset optimization. Once enabled, it will analyze your page and lists all the resources found on the page.
Then enable the advanced mode to get full control over your files.
But, you need to be careful, as it can easily break your website if configured incorrectly. Just do one change at a time, then publish and check the frontend for errors.
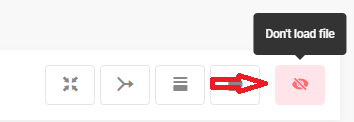
Remove Unused Resources
Spotting unused resources can be difficult, especially if you don’t have experience with web development.
You can use the trial and error method. Click “Don’t load file” for an asset and check the frontend. If it is loading without any issue, then the file is probably not used.
What I did?
jQuery-migrate and jQuery date pickers are something that I don’t use anywhere, so I removed them.
I use Yet Another Related Post Plugin to display related posts, but I use a custom template. Hence, it is evident that the plugin’s CSS files are not required, so I removed them too.
Similarly, you should be able to find the files that are not used and stop loading them.
Compress CSS and JS files
Compression reduces the file size, thereby reducing the total size of the contents that need to be loaded. Thus reducing the overall page load time.
We can compress the CSS and JS files using the Hummingbird plugin.
In the list of resources that Hummingbird found on your page, find the uncompress files. Then compress them by clicking the “Compress” button against the file.
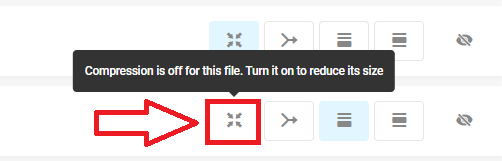
Then publish the changes and check the frontend. If you see files served from the hummingbird-assets folder, then the compression is working as expected.

Deferring Resources
Not all resources are required to be loaded upfront. We can defer loading the noncritical resources. For example, fonts are not required to be loaded upfront.
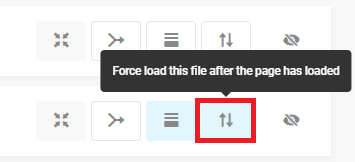
What I did?
I moved all the font family declaration from my primary stylesheet to a new stylesheet fonts.css and deferred it. So, for initial render, none of the fonts are loaded.
Therefore, the initial render happens very quickly.
5. Optimizing Images
Images are crucial to writing good content. But they are also one of the heaviest resources on the page, that is why optimizing images is critical.
Use Properly Sized Images
When you upload an image, WordPress will automatically scale down images to various sizes. You can configure these sizes in Settings -> Media page.
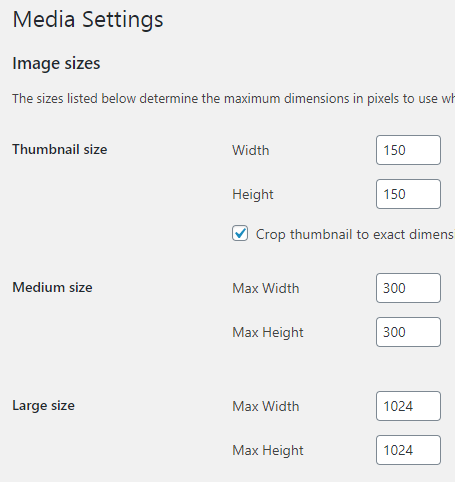
Configure these sizes based on areas where you embed images. For example, If your content area is 800px wide, then set the “Large size” less than or equal to 800px.
Choose image size while embedding
If we don’t make use of these scaled-down images, the original image will be served. Even though the image is going to be squeezed in fit into the content area.
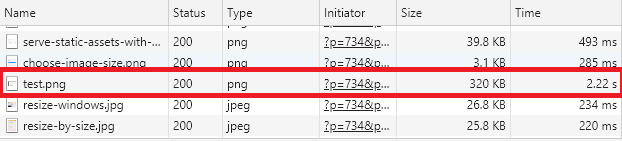
It will increase the page load time and consume the user’s bandwidth unnecessarily.
To make use of these scaled-down images, WordPress will give you an option to choose the size when you embed an image into a post or page.
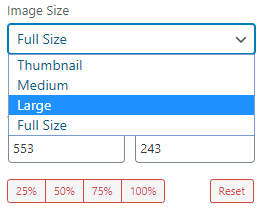
Make sure to select a size that will fit nicely into the content area.
Resize images before uploading
The original file is stored in the server even though it is not being used, wasting your disk space.
That’s why it is a good practice to resize the images before uploading.
Resizing an Image using MSPaint
You don’t need fancy applications to resize an image, MSPaint will do just fine. Open the image in MSPaint and click on the “Resize” options.
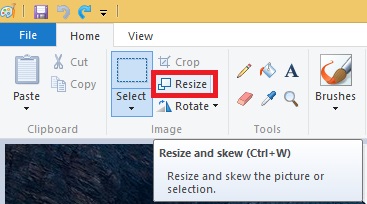
Now it will open a popup window asking you for the new size. Check the “Maintain aspect ratio” option, then enter the size in “Pixels” and click “Ok”.
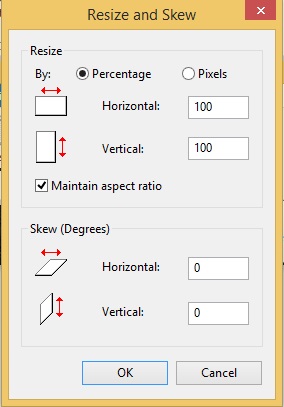
That’s it, and now you have an appropriately sized image. Save it and upload it.
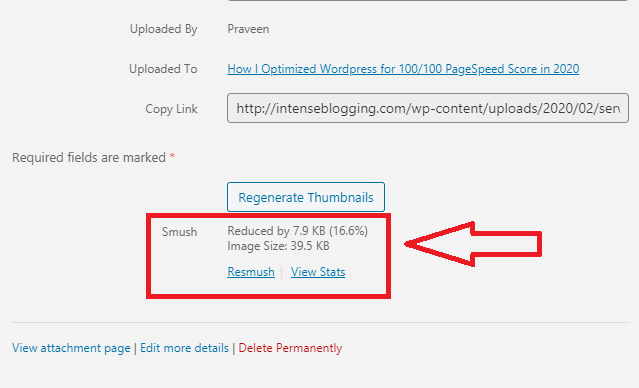
Compress Images
There are many plugins out there to optimize the images. I’m using Smush to compress the images.
By default, Smush compresses the images automatically when it is uploaded.
If you see the compression stats in the Media Library, then the compression is working as expected.
Lazy Loading Images
Images present outside the initial viewport are not required to be loaded upfront. Instead, we can load them asynchronously when the image is about to enter the viewport. It is called Lazy loading.
Lazy loading can dramatically reduce the page load time, especially when the page has many images.
To enable Lazy Loading, navigate to “Smush -> Lazy Loading”, scroll to the bottom of the page and click “Activate”.
Now, if you open a page with images and scroll down quickly, you can see the images getting lazy-loaded as you scroll.
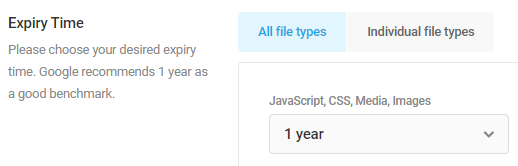
6. Set up HTTP Caching
If we serve the static files with a cache-control header, then the browser will cache the data in the local machine. When the same file is requested the second time, the browser will use the cached data instead of asking the remote server.
To enable HTTP caching, navigate to “HummingBird -> Caching -> Browser Caching Tab” and click “Activate”.
Set the cache expiry time to 1 year. It won’t cause any issues, as long as all the files are served with the version number in the query string. For example, style.css?ver=1.0.0.
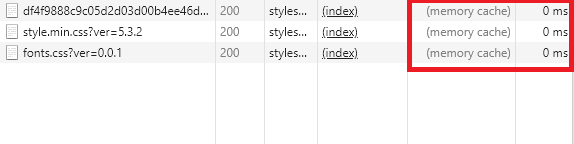
Now, open Chrome Dev Tools and reload the page. If you can see the cache-control header in the response, then the server is correctly configured to send the cache-control header.
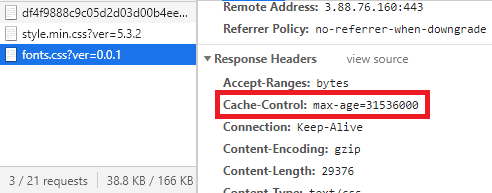
Now reload the page. If you see “memory cache” under the size column, then browser caching is working as expected.
7. Enable Gzip
Gzip is a content encoding used in compressed files. It can be used to compress the static files.
We can configure the server to compress a file before sending it to the browser. All major browsers support Gzip, which means the browser will automatically decompress the file and use it.
All major browsers support Gzip encoding. When a server sends a compressed file, the browser will automatically decompress and use it.
To enable Gzip, Navigate to “Hummingbird -> Gzip Compression”. Select your server type and click “Activate”.
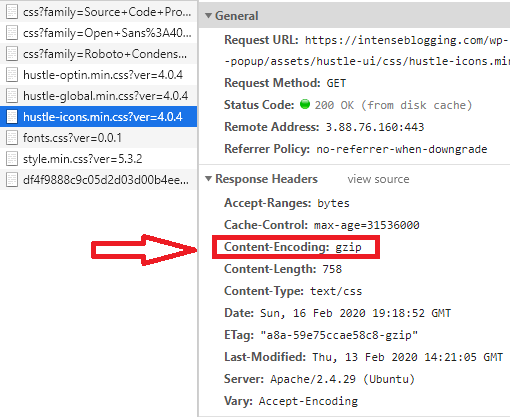
Now, open Chrome Dev Tools and reload the page. If you can see the content-encoding header in the response, then Gzip compression is configured correctly and working as expected.
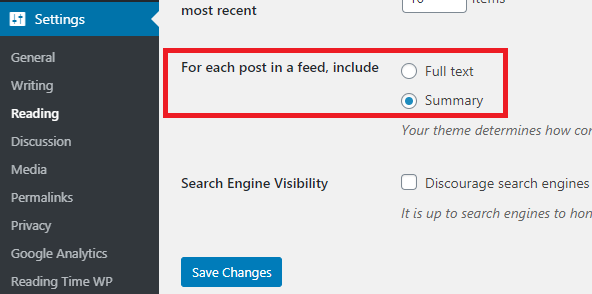
8. Show Summary in Archives
WordPress, by default, will display the entire content of the post on the homepage and archives. It will increase the overall size of the page and the page load time.
Instead, we can configure WordPress to display only the summary of the post.
Navigate to “Settings -> Reading”. Update “For each post in a feed, include” to “Summary”.
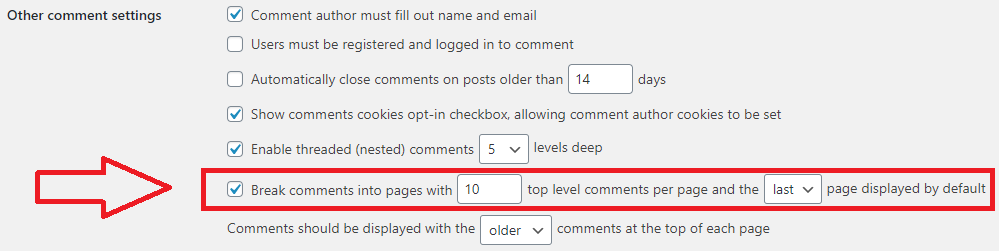
9. Use Pagination for Comments
WordPress by default loads all the comments upfront. If your posts have many comments, then it will affect the page load time significantly.
To enable pagination for comments, navigate to “WordPress -> Discussions”.
10. Clean Up the Database
After using WordPress for some time, the database gets filled with junk like – post revisions and trashed posts/comments.
Although MySQL can handle millions of rows easily, it is a good practice to keep the database clean, so that we can use the database system to their full potential.
To clean up the database, navigate to “Hummingbird -> Advanced Tools” and navigate to the “Database Cleanup” tab and delete data that you don’t need.
You can also reduce the number of post revisions stored by adding the following line in wp-config.php file.
define('WP_POST_REVISIONS', X);where x is the number of revisions to store.
Finally to summarize,
- It is important to improve WordPress performance and to have a good page speed.
- To improve TTFB, use fast DNS providers, set up page caching, and use a CDN.
- Optimize CSS and JS files by removing unused files, deferring noncritical files, and compressing the files.
- Optimize images by uploading them in the proper size, compressing them, and lazy-loading them.
- Make use of HTTP caching by configuring the server to send a cache-control header.
- Make use of Gzip compress.
- Show only summary on archive pages.
- Don’t load all the comments at once, instead paginate them, especially if you have many comments.
- Clean up junks from the database.
I hope this article will help you to improve WordPress performance. If you face any issues, let me know in the comment section.