WordPress on AWS LightSail – A Complete A-Z Guide

WordPress on AWS LightSail is one of the most reliable ways of launching a WordPress Blog and still a very cost-effective way. It brings in benefits like one-click WordPress installation, managed environment, and scalability. Everything at a price starting from $3.50 USD per month.
This article will guide you through the entire process of setting up a WordPress blog on AWS LightSail. Right from purchasing a Domain name to setting up Google Analytics.
Please note that this is not going to be a straightforward way to get started. If you are looking for an easy and quick setup, you can get started on Bluehost at just $3.50USB/month, including a domain name.
Overview: WordPress on AWS LightSail
- Create Instance for WordPress LightSail on AWS Lightsail
- Create and attach a static IP address
- Purchase a Domain Name
- Create a Lightsail DNS Zone
- Configure Route53
- SSH into the Server
- Setup SSL Certificate using LetsEncrypt
- Use AWS SES to send WordPress emails
- Set up Google Search Console
- Set up Google Analytics
Login to your AWS Management Console, let’s get started!
Create Instance for WordPress on AWS Lightsail
Navigate to Amazon Lightsail. Click on “Create Instance“.
Select the region based on your target audience. It’s best if your servers are near them. Select “Linux/Unix” as the platform (unless for some weird reason you prefer Windows). Select “Apps + OS” and “WordPress” to get a server that comes with a pre-installed WordPress.
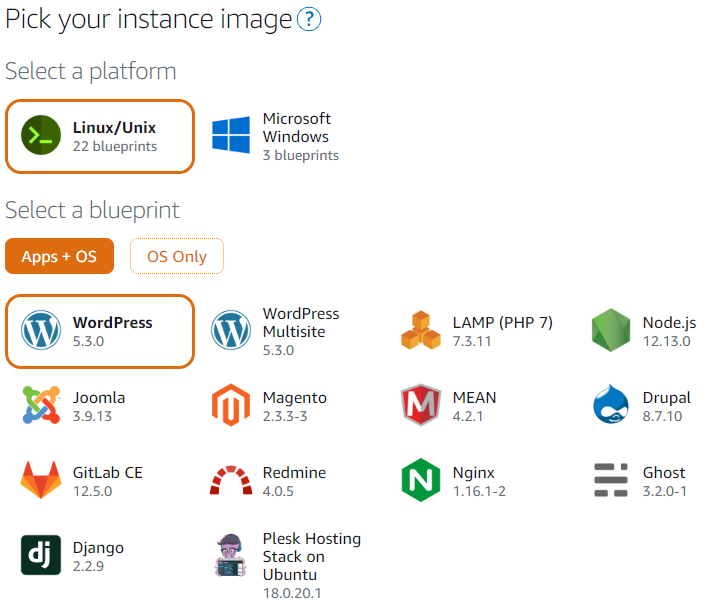
Finally, for the instance plan, choose the cheapest. It is more than enough for a new blog. If you are migrating your existing blog to AWS, you might want to choose a plan based on your traffic. Click “Create Instance,” and it’s done, and the server will be up and running in a few seconds.
Create and Attach a Static IP Address
When the server is created, it doesn’t get a static IP automatically. So we need to create it manually. Click on the instance name, navigate to the “Networking” tab, and click on “Create Static IP“.
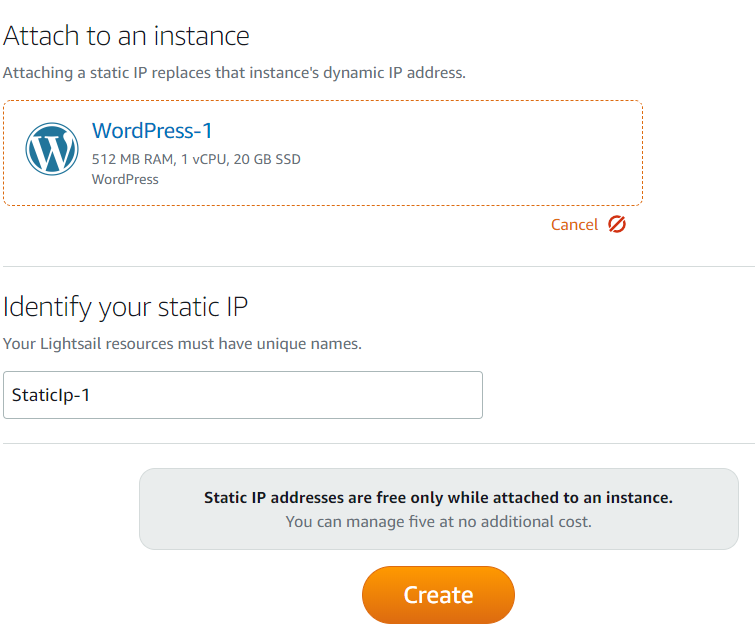
Select the instance that we just created, give an identification name for the static IP, and click “Create“. Once done, you will get a Public static IP address. If you navigate to that IP in your browser, you should be able to see WordPress in action.
Purchase a Domain Name
Now that we have a static IP address, we need an alias for it – a domain name.
To buy a domain name go to Route 53. Search for the domain name and check it’s availability. Once you found a preferred name that is available, click “add to cart” and “Continue“. You will be asked to provide the registrant contact information, and this information will show up as the domain’s whois information. Once done, click “Continue” and “Complete Order“.
Then you will be asked to verify and pay. Complete the payment to complete the domain registration process.
Create a Lightsail DNS Zone
Navigate to the “Networking” tab from Lightsail’s homepage. Click “Create DNS Zone” and enter the domain name that you purchased in the previous step. Once you create the DNS Zone, you will get the list of Name Servers, and we will be using these name servers in the next step to configure Route 53.
Now, click on “Add Record“. Make sure “A record” is selected. Set “@” as the subdomain (unless you want to host the WordPress under a subdomain) and select the static IP name for the “resolves to” the field. What we are essentially doing is, setting the domain name as the alias to the static IP address that we created.
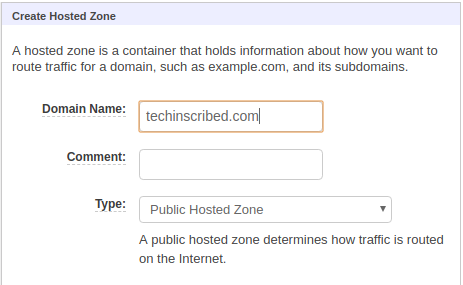
Configure Route53
In the last step, we configured the Lightsail DNS, but when a request is made to the domain name, it hits the route53 by default and not the Lightsail DNS. To fix this, we will configure route53 to use Lightsail Domain Name Servers.
Go back to Route53, click on “Hosted Zones“, and then “Create Hosted Zone“. Enter the domain name and click “Create“.
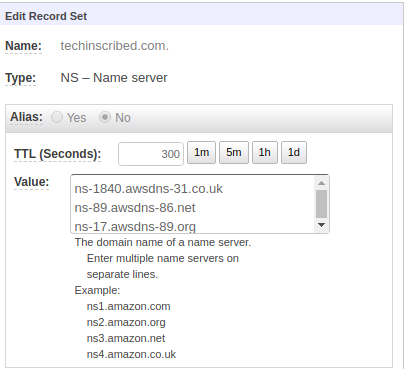
Once the hosted zone is created, add a recordset with a name field as blank (assuming you are not setting up the blog in sub-domain). Choose “NS – Name Server” as the type and paste the name servers that we got in the previous step, like this:
Now you should be able to access the WordPress blog using the domain name. If it didn’t work, give it a few minutes and then retry.
SSH into the Server
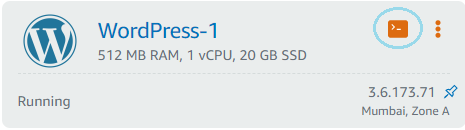
To login to the server, go back to the Lightsail home page. Click on the shell icon, and it will open a browser-based terminal giving you access to the server.
Setup SSL Certificate using LetsEncrypt
Now that we have the SSH access to the server, we can request an SSL certificate using Certbot and LetsEncrypt.
Install Certbot
To install Certbox run the following commands.
sudo apt-get update
sudo apt-get install software-properties-common
sudo apt-add-repository ppa:certbot/certbot -y
sudo apt-get update -y
sudo apt-get install certbot -y
Request Wildcard Certificate
Then we will set two environment variables $DOMAIN and $WILDCARD. Make sure to replace “domain” with your domain name in the first command and then simply copy-paste the following commands to request a LetsEncrypt SSL wildcard certificate.
DOMAIN=domain
WILDCARD=*.$DOMAIN
sudo certbot -d $DOMAIN -d $WILDCARD --manual --preferred-challenges dns certonly
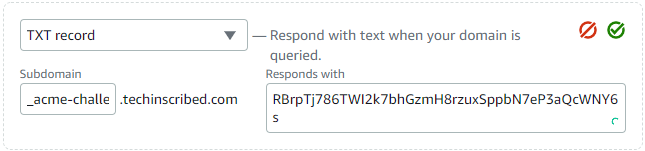
LetsEncrypt will ask you a few questions, answer them, and keep following the wizard. LetsEncrypt will then ask you to verify the ownership of the domain name by adding some TXT DNS records to the DNS configuration. You can add the record in the Lightsail DNS zone that we had created earlier, like this:
Then in the terminal, press “Enter” to continue the certificate request. If everything goes well, you will see the following message in the terminal.

Next, we will copy the generated certificate keys to the Apache folder and restart the server for the changes to take effect.
sudo /opt/bitnami/ctlscript.sh stop
sudo mv /opt/bitnami/apache2/conf/server.crt /opt/bitnami/apache2/conf/server.crt.old
sudo mv /opt/bitnami/apache2/conf/server.key /opt/bitnami/apache2/conf/server.key.old
sudo mv /opt/bitnami/apache2/conf/server.csr /opt/bitnami/apache2/conf/server.csr.old
sudo ln -s /etc/letsencrypt/live/$DOMAIN/privkey.pem /opt/bitnami/apache2/conf/server.key
sudo ln -s /etc/letsencrypt/live/$DOMAIN/fullchain.pem /opt/bitnami/apache2/conf/server.crt
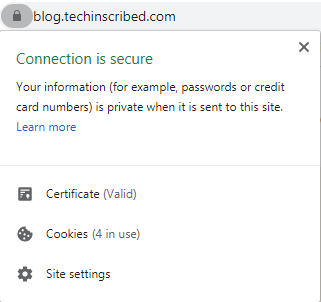
sudo /opt/bitnami/ctlscript.sh startNavigate to https://your-domain. If you can see this lock icon in the address bar, then SSL is configured correctly.
Redirect HTTP to HTTPS
We don’t want anyone to use the HTTP version, so we will set up a redirection from HTTP to HTTPS.
Now run the following command in the terminal to make the wp-config.php file writeable.
sudo chmod 666 /opt/bitnami/apps/wordpress/htdocs/wp-config.phpNow, it’s time to log in to the WordPress admin dashboard. Navigate to https://our-domain/wp-admin/. The default admin username is “user”. To get the password, run the following command in the terminal.
cat bitnami_application_passwordAfter logging in, go to “Plugins > Add New“, search for the plugin “Really Simple SSL“. Install and activate it. Once done, click “Go ahead and activate SSL” in the prompt that appears. Now visit the HTTP URL of your domain and see if the redirection is working.
If you’d like to do it manually without the plugin, follow the bitnami’s documentation.
Use AWS SES to send WordPress Emails
The server that we have created doesn’t have a built-in email server to send/receive emails. So we will use AWS SES to send emails, go to AWS SES and follow along.
Verify the Domain
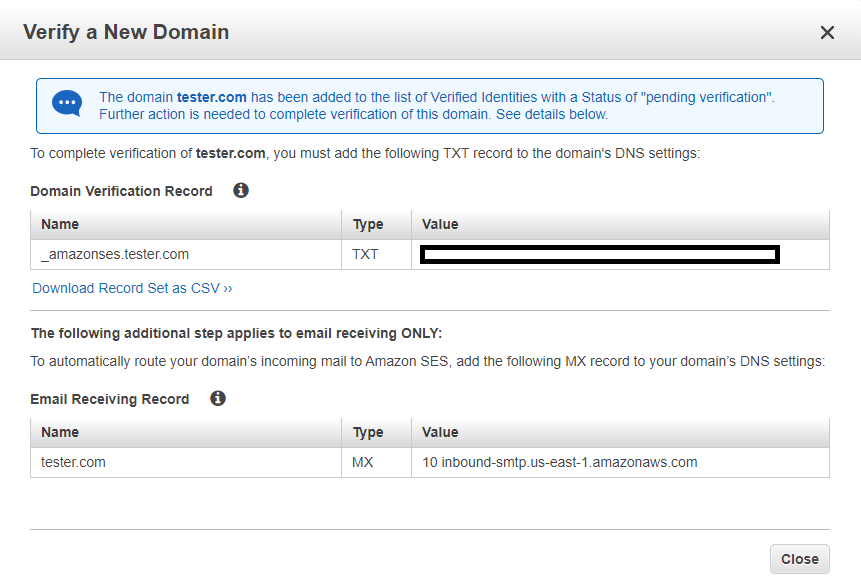
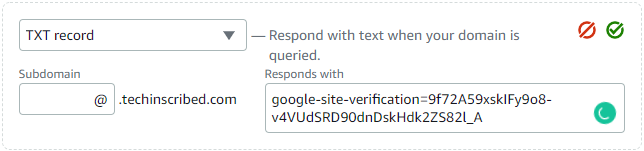
Navigate to the “Domains” tab, and click on “Verify a New Domain“. Enter your domain name and click “Verify this Domain“. It will ask you to add a TXT and MX DNS records. Add them to the Lightsail DNS Zone, like how we did in the previous steps.
Verify the Email Addresses
Navigate to the “Email Addresses” tab, and click on “Verify a New Email Address” and enter your email address. You will then receive an email with a verification link, click on it, and then the email address will be verified.
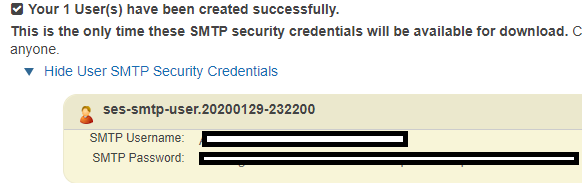
Create SMTP Credentials
Navigate to the “SMTP Settings“. You should see some SMTP server details that need to be used for sending emails using AWS SES. We will use this information in the next step while configuring the WordPress plugin.
Now, click on “Create My SMTP Credentials“. Next, enter a preferred username and click “Create“. Now the SMTP credentials we will be generated and be available for you to view/download. Download it and keep it safe as you won’t get another chance to see these keys.
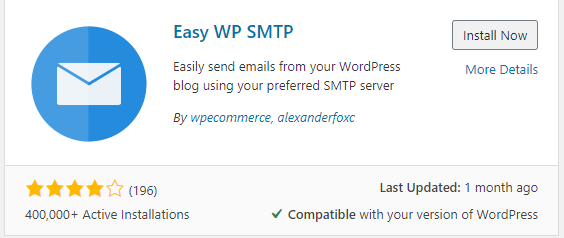
Installing WP SMTP plugin
Log in to your WordPress admin panel, and navigate to “Plugins > Add New“. Search for “Easy WP SMTP”, install and activate the plugin.
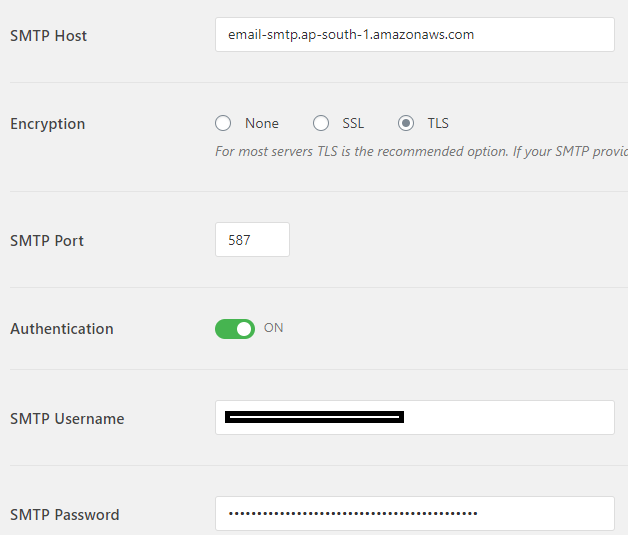
Now to configure the plugin, go to “Settings > Easy WP SMPT“. Enter the “from” email address (should be verified in the previous step) and name for all the emails sent from your blog.
Finally, configure the SMTP server details using the details we got from the previous step. For Example:
Now, go to the “Email Test” tab in the plugin configuration page and send a test email.
Note: The recipient should also be verified email address. If you want to send emails to unverified email addresses, you should raise a support request to AWS, asking them to move your account out of AWS SES Sandbox.
Set up Google Search Console
Go to Google Search Console. Enter your domain name under the “Domain” section and click “Continue”. Now you will be provided with another TXT record that needs to be added to your DNS Configuration.

Go back to Lightsail and add the TXT record into the DNS Zone like this:
Finally, click “VERIFY” on Google Search Console. Please note if it didn’t work immediately, check again after some time.
Set up Google Analytics
Go to Google Analytics. Enter a preferred account name and choose the “Web” as the platform that we need to measure. Lastly, enter your website details along with the timezone in which you need to view the reports and click “Create“. You will be given a tracking code that needs to be added to your WordPress blog.
Instead of manually adding it, we will use the GA Google Analytics plugin. Install and activate it and go to “Settings > Google Analytics” to configure the plugin.
Now instead of using the entire tracking code, we will copy only the tracking ID (that looks like UA-XXXXXXXX-X) and give it to the plugin. Also, check the “Disable tracking of Admin-level users” option so that your activity on the site doesn’t mess up the analytics report.
That’s it, now your WordPress on AWS Lightsail should be ready for publishing some contents. I know it is not an easy way to get started, as it requires a lot of manual configuration, but it is a good learning exercise. Try Bluehost at just $3.50USB/month (including a domain name) if you are looking for an easy and quick way to get started.
If you are facing any other issues in setting up WordPress on AWS Lightsail, let me know in the comments.