Authentication in Serverless React Application using AWS Amplify

In this article, we will demonstrate how to add authentication to our serverless application using AWS Amplify.
Install AWS Amplify CLI
AWS Amplify CLI is a toolchain that allows you to create and manage AWS resources created for our application. In this case, it will help you to create and manage AWS Cognito User Pools and Authentication APIs.
We can install it globally:
npm install -g @aws-amplify/cliConfiguring AWS Amplify CLI
First, you need to configure the Amplify CLI to tell which AWS account to use for all future actions. To configure the following command:
amplify configureIt will prompt you to log in to your AWS account by opening the AWS Management Console’s login page in the browser. Sign in and proceed, if you are already signed in simply proceed by pressing Enter on the terminal.
It will next prompt you to choose a default AWS region. This is where it will create all the Amplify projects and related AWS resources.
Next, AWS Amplify will prompt you to create an IAM user for Amplify CLI to use. It’s good to create a separate IAM user instead of using an existing user. So, go ahead and choose an IAM username, it will then open the browser tab to complete the IAM user creation, just proceed with the default settings and complete it. Once done you will get an Access Key ID and Secret Access Key. You have to enter these keys in the terminal in the next step.
That will bring us to the last step, that is to create an AWS profile entry in ~/.aws/credentials.
Create New React App
Create a fresh React application using create-react-app.
npx create-react-app serverless-auth
cd serverless-auth
Add Amplify to your Application
To add amplify to your application run the following command from your application’s root directory.
amplify initIt will create an Amplify project in the AWS Management Console. It will also create a Cloud Formation root stack with two IAM Roles and an S3 Bucket.
Once the cloud resources are created, a local file named aws-exports.js is created in your source directory with all the metadata related to the cloud resources.
Add Authentication to your Application
Now you can add the AWS Amplify Authentication module to your project by running the following command:
amplify add authSelect Default Configuration with Social Provider as the authentication configuration as you need to allow the user to sign in with Facebook and Google. We will also allow users to sign-in using both Email and Phone Number.
It will then ask you whether you want to configure advanced settings? Select Yes, I want to make some additional changes.
Choose Name as a required attribute and make sure you uncheck Email. Otherwise, the sign-up form on hosted UI will show two fields for Email.
Enable Email Verification so that users can recover their password in case they forgot it.
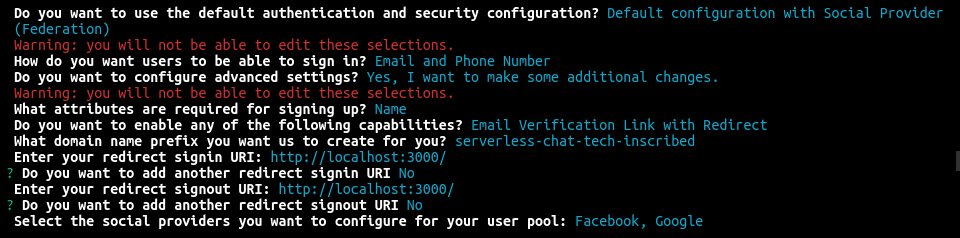
Then you will be prompted to enter Facebook and Google App ID and Secrets. If you don’t have them created already, you should create it now to proceed further.
The next step is to push the new amplify changes to AWS. You can do that using the push command:
amplify pushThis will create a nested Cloud formation stack under the root stack with AWS Cognito User Pool using the configuration we selected in the previous step.
Once it has finished creating the cloud resources, it will output the hosted UI URL and also update the aws-exports.js file with the metadata for newly created resources.

Add Amplify Libraries to the Application
To call AWS Amplify service from your application you need the AWS Amplify libraries for JavaScript and React. You can install them by running the following command:
yarn add aws-amplify aws-amplify-reactYou need to provide a config to Amplify library, we can do it by passing in the configuration from aws-exports.js to Amplify.configure method like so:
import Amplify from 'aws-amplify';
import config from './aws-exports.js';

Amplify.configure(config);
This needs to be done only once at the top-level, hence index.js is an ideal place to put it.
Protecting React Components
Let’s assume the contents of the App component is to be protected with authentication. Then all you need to do is wrap the App component in withAuthenticator HOC provided by aws-amplify-react package.
import { withAuthenticator } from 'aws-amplify-react';

function App() {
   return (
      // Code removed for brevity
   )
}

export default withAuthenticator(App, {
  includeGreetings: true
});
withAuthenticator HOC will take care of checking the authentication state and rendering the appropriate components.
You need to modify the sign-up form to match our authentication configuration and custom attributes. You can do it by passing in a signUpConfig to the withAuthenticator HOC.
const signUpConfig = {
  header: 'Create an Account',
  hideAllDefaults: true,
  defaultCountryCode: '1',
  signUpFields: [
    {
      label: 'Name',
      key: 'name',
      required: true,
      displayOrder: 1,
      type: 'string'
    },
    {
      label: 'Email or Phone number',
      key: 'username',
      required: true,
      displayOrder: 2,
      type: 'string'
    },
    {
      label: 'Password',
      key: 'password',
      required: true,
      displayOrder: 3,
      type: 'password'
    }
  ]
};

export default withAuthenticator(App, {
  includeGreetings,
  signUpConfig
});
To display the Sign In with Facebook and Google buttons you need to pass the client ID to the withAuthenticator HOC like so:
export default withAuthenticator(App, {
  includeGreetings,
  signUpConfig,
  federated: {
    google_client_id: 'google-client-id-goes-here',
    facebook_app_id: 'facebook-app-id-goes-here'
  }
});
That’s it! You have successfully added authentication to your application using AWS Amplify. Start your application by running yarn start

You can access the whole code on Github – serverless-auth-amplify.
There are few issues with our application like sending verification code to phone numbers, merging accounts, and the bad look and feel but that will be for another day, another article.