Passwordless Phone Number Authentication using AWS Amplify & Cognito

Storing user passwords has always been a risk. On top of it, it requires the user to remember more details – username and password. It is also inconvenient for users to recover their account in case they forget their password. To solve these problems many services have started to opt for Passwordless authentication using Phone number and E-mail.
Passwordless Authentication using Phone Number
In passwordless authentication, a user needs to remember only their username which is usually a phone number or email. The process is similar to recovering a forgotten password but shorter and quicker.
When a user enters their phone number, they will receive a one time password (OTP) to their phone then they have to enter it on the next screen.
In this article, we will implement a passwordless phone number authentication in a serverless application using AWS Amplify & Cognito. Let’s get started!
Creating Cognito User Pool
Attributes
We want our users to use their phone numbers as the username. Hence in the attributes section, choose “Email address or Phone number” and under that choose “Allow Phone numbers”.
To make our sign up process even simpler we won’t require any standard or custom attributes from the user.
Policies
The only thing that matters in this section is to “Allow users to sign themselves up“.
MFA and Verifications
We don’t have MFA for passwordless authentication, hence make sure “Off” is selected.
Account recovery is also not applicable for us, so we will select “None – users will have to contact an administrator to reset their passwords“.
We don’t need verification as well, because the phone number is implicitly verified every time user signs in using the OTP. Select “No Verification“.
App Clients
Click “Add an App Client”. Provide a name for the App Client and make sure you uncheck “Generate Client Secret“.
AWS Cognito doesn’t support passwordless authentication out of the box. So, we will select “Enable lambda trigger-based custom authentication” and uncheck other configurations.
Triggers
This is the most important section. We will come back to this later when we have our lambda functions ready.
So go ahead and finish the remaining step and create the User Pool.
Custom Authentication Flow
Custom authentication flow are be implemented using the Cognito triggers and lambdas. We have to write lambda function for each step in the authentication flow. Following steps describe our authentication flow:
- User will enter the phone number, and click Login.
- User pool will receive the phone number, it will then call the “Define Auth Challenge” lambda. This lambda is responsible to drive the entire authentication flow. It determines which custom challenge needs to be created. In our case, the custom challenge will be to send and verify OTP.
- User pool will then call “Create Auth Challenge” lambda function. This lambda will generate a OTP and sends it as an SMS.
- User will then retrieve and enter the OTP.
- User pool will then call “Verify Auth Challenge” lambda function. This lambda is responsible to check if the OTP user has entered is correct or not.
- User pool will then again call “Define Auth Challenge” to check whether the user has completed all the challenge. In case of Multi-factor authentication there will be multiple challenges.
- Once all the challenges are completed, user will be logged in successfully.
Pre Sign Up
This lambda function is responsible to auto confirm and auto verify phone number during sign up.
exports.handler = async (event) => {
    event.response.autoConfirmUser = true;
    event.response.autoVerifyPhone = true;
    return event;
};
Define Auth Challenge
It will receive a session array that will have the details of all the challenges and its result.
If the session array is empty, it means the authentication flow has just begun. Then we will present the “CUSTOM_CHALLENGE“.
If the session array is not empty, it means the user has answered the challenge and their answer is validated to be right or wrong. The validation result will be present in challengeResult field.
If answer is wrong, we will provide the same challenge once again. This way we will give the user 3 chances to enter the correct OTP. If wrong OTP is entered in all 3 attempts we will close the session and return an error.
If the OTP is correct, we will login the user and issue the authentication tokens.
Additionally, we will also check if the user is already registered or not. If user is not registered we will throw an error. The right place to do this is actually “Pre Authentication” trigger, but for some reason that trigger doesn’t work for custom authentication flow.
exports.handler = async (event, context, callback) => {
    console.log(event.request);

    // If user is not registered
    if (event.request.userNotFound) {
        event.response.issueToken = false;
        event.response.failAuthentication = true;
        throw new Error("User does not exist");
    }

    if (event.request.session.length >= 3 && event.request.session.slice(-1)[0].challengeResult === false) { // wrong OTP even After 3 sessions?
        event.response.issueToken = false;
        event.response.failAuthentication = true;
        throw new Error("Invalid OTP");
    } else if (event.request.session.length > 0 && event.request.session.slice(-1)[0].challengeResult === true) { // Correct OTP!
        event.response.issueTokens = true;
        event.response.failAuthentication = false;
    } else { // not yet received correct OTP
        event.response.issueTokens = false;
        event.response.failAuthentication = false;
        event.response.challengeName = 'CUSTOM_CHALLENGE';
    }

    return event;
};
Create Auth Challenge
This lambda function is responsible to generate the OTP and send it as an SMS.
Once the OTP is generated, we can send the SMS using AWS Simple Notification Service. We will also store the generated OTP in two fields:
privateChallengeParamaterthis field will be read by Verify Auth Challenge lambda to compare it against the answer.challengeMetaDatathis field will be persisted across multiple calls to Create Auth Challenge. So that we don’t have to generate a new OTP and send SMS for the 2nd and 3rd attempts, instead we can re-use the OTP generated on the 1st attempt.
const AWS = require('aws-sdk');

function sendSMS(phone, code) {
    const params = {
      Message: code, /* required */
      PhoneNumber: phone,
    };

    return new AWS.SNS({apiVersion: '2010-03-31'}).publish(params).promise();
}

exports.handler = async (event) => {
    console.log("CUSTOM_CHALLENGE_LAMBDA", event.request);

    let secretLoginCode;
    if (!event.request.session || !event.request.session.length) {

        // Generate a new secret login code and send it to the user
        secretLoginCode = Date.now().toString().slice(-4);
        try {
            await sendSMS(event.request.userAttributes.phone_number, secretLoginCode);
        } catch {
           // Handle SMS Failure
        }
    } else {

        // re-use code generated in previous challenge
        const previousChallenge = event.request.session.slice(-1)[0];
        secretLoginCode = previousChallenge.challengeMetadata.match(/CODE-(\d*)/)[1];
    }

    console.log(event.request.userAttributes);

    // Add the secret login code to the private challenge parameters
    // so it can be verified by the "Verify Auth Challenge Response" trigger
    event.response.privateChallengeParameters = { secretLoginCode };

    // Add the secret login code to the session so it is available
    // in a next invocation of the "Create Auth Challenge" trigger
    event.response.challengeMetadata = `CODE-${secretLoginCode}`;

    return event;
};
Verify Auth Challenge
This lambda function is responsible to check if the OTP entered by the user is correct or not.
When user enters the OTP, it will be available in the challengeAnswer field of the event request object. We can also read the actual generated OTP from the privateChallengeParameter field and compare it to check if the user entered OTP is correct or not.
exports.handler = async (event) => {
    console.log(event.request);

    const expectedAnswer = event.request.privateChallengeParameters.secretLoginCode;
    if (event.request.challengeAnswer === expectedAnswer) {
        event.response.answerCorrect = true;
    } else {
        event.response.answerCorrect = false;
    }

    return event;
};
Custom Sign In Page
We need to create a custom sign-in page to match our custom authentication flow. But, first we need to add Amplify to our project:
yarn add aws-amplifyAlso Read: Authentication in Serverless React Application using AWS Amplify
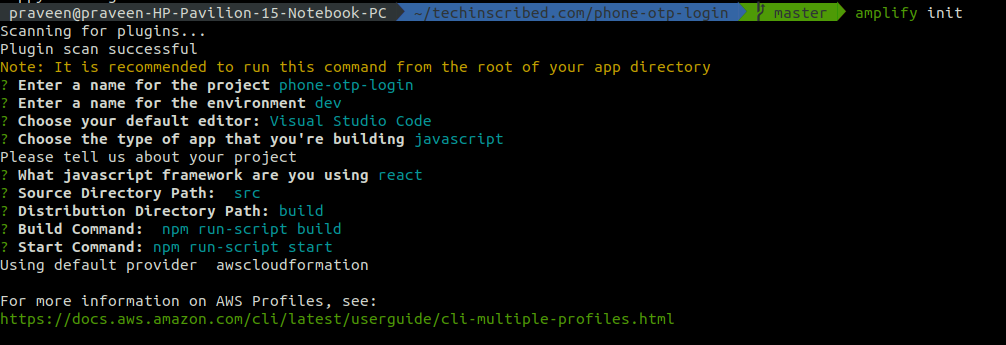
Add Amplify to the Project
We will be using Amplify’s authentication module. For that, we need to first add Amplify to our project.
amplify initThis will ask you a series of simple questions. Just follow the wizard and finish it.
Configure Amplify
To configure Amplify, we need to provide the Region code, Cognito User Pool ID and App Client ID.
import Amplify, { Auth } from 'aws-amplify';

Amplify.configure({
  Auth: {
    region: 'us-east-1',
    userPoolId: '**********',
    userPoolWebClientId: '******************',
  }
});
Sign Up
We can sign up a new user by calling the signUp. Since AWS doesn’t support passwordless authentication it requires us to provide a password. So, we can use a random dummy password.
try {
  await Auth.signUp({
    username: phoneNumber,
    password: Date.now().toString()
  });
} catch {
  // Handle sign up error
}
Sign In
We can initiate our custom authentication flow by calling the signIn method.
try {
  const cognitoUser = await Auth.signIn(phoneNumber);
} catch {
  // Handle sign in errors
}
Once the promise is resolved, we can prompt the user to enter the code.
Answer the Custom Challenge
We can submit the code to User Pool for verification by calling sendCustomChallengeAnswer with cognitoUser (returned on signIn call) and the OTP as paramaters.
try {
  const cognitoUser = await Auth.sendCustomChallengeAnswer(user, OTP);
} catch {
  // Handle 3 error thrown for 3 incorrect attempts.
}
Once the promise is resolved user will be logged in successfully and you will get the authentication tokens in response.
Check logged-in user information
To get information about the current logged in user, we can use currentAuthenticatedUser method. This method will throw an error if user is not logged in, so it can be used to check if the user is logged in or not.
try {
  const data = await Auth.currentAuthenticatedUser();
} catch {
  // User not logged in
}
That’s all folks! It wasn’t that difficult was it? So what do you think about the passwordless authentication – will you develop one in your next project?